I wanted to start growing plants indoors because the rabbits just kept eating all of my tomatoes. I went searching for the simplest way to start growing with hydroponics, without having to build something massive, that required a lot of tools and engineering ability.
That’s when I came across this 5-gallon hydroponic bucket system using hardware buckets that everyone probably has at least one of. So I did what any normal person would do – I watched every single video and read every article, and combined all of the best pieces of their systems to build this thing of beauty!
Of course, you can just buy the DWC system starter kit, but I felt like doing this myself was easy enough to save a few bucks and learn in the process.
How it Works
There are a few ways you can create a hydroponic garden using 5-gallon buckets, but the two most common are the Kratky Method and Deep Water Culture (DWC).
Kratky Method
The Kratky method of growing hydroponically is definitely the most simple method. You essentially put nutrient-dense water in a bucket and call it a day. No air pumps, air stones, or air hose are required.
The plant’s roots grow into the water, and as the plants use up the nutrient solution the air bubble at the top of the bucket gets larger and provides more oxygen throughout the growing process.
Deep Water Culture System (DWC)
Deep water culture on the other hand requires a few more pieces of gear than the Kratky, including:
- Air pump
- Air stone
- Tubing

While you need more pieces of equipment to grow plants this way, the results often far exceed that of the Kratky Method. The air stone provides a constant flow of air bubbles to the plants roots, giving them more oxygen. This is also why its sometimes called “bubbleponics” or a “bubble bucket.”
This additional airflow and oxygen usually leads to a much denser root system, and the plants are able to grow bigger and faster.
If you’re already setting up a Kratky system, if you have an electrical input nearby, switching it to a deep water culture system isn’t much more work, but offers much greater results.
How to Build It
Let’s get to the building! I’ll be walking through both the Kratky and DWC systems so you can decide which is right for you.
What You Need
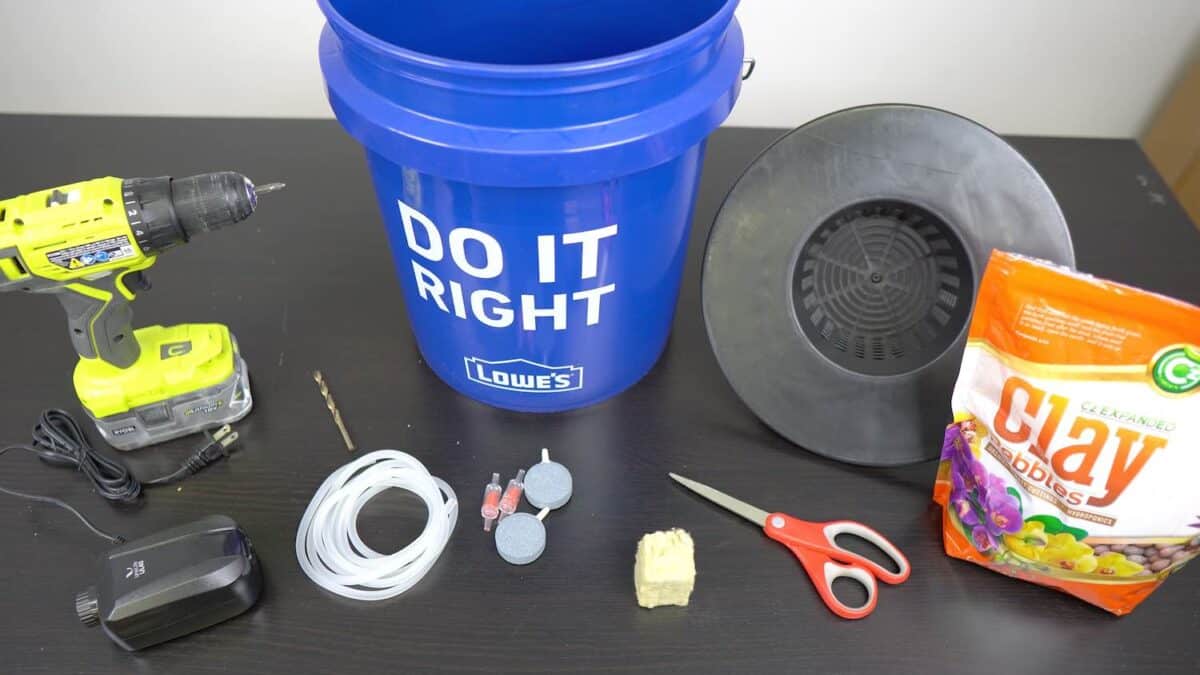
Here are the materials you’ll need to have to set up this system. These are for a single bucket, but if you want to add more you can double almost everything (air pumps can often work for 4 or more air stones at once!)
- 1 x 5-gallon bucket (around $5 at big box hardware stores)
- 1 x net cup lid – I use a 6-inch one for most plants, but they also come in 8 or 10 inch sizes for larger plants
If you’re going to use the Kratky method, that’s it (aside from nutrients which I’ll cover later). If you want to use the deep water culture system, you’ll need these as well:
- 1 x air pump (this kit comes with the air stone and tubing as well)
- 1 x air stone
- 1 x 1/4 inch tubing
- A drill with a 1/4 inch drill bit (1/4 inch if you use the air pump kit above that comes with 1/4 inch tubing)
Step 1: Drill A Hole
To get started, you want to drill a hole in the side of the bucket using your quarter-inch drill bit. This is where the tubing for the air stone will fit through.
Before you drill the hole, put the net pot bucket lid on top to make sure your hole is low enough for it to fit snugly. This is usually around a quarter of an inch from the top of the bucket.
You could alternatively drill a hole in the net cup lid, but that can get in the way when you’re lifting the lid to add nutrients or check the pH.
Step 2: Attach Air Pump & Air Stone
Attach the air stone to one end of the tubing, and place it in the middle of the bottom of the bucket.
Next, you’ll want to feed the other end of tubing through the hole we just drilled. Make sure there is enough tubing for your air stone to sit in the middle on the bottom of the bucket and the other end to reach your air pump.
Attach the other end of tubing to the air pump. The air pump I have comes with “check valves” to make sure water doesn’t get into your air pump and ruin it. Attach these first if you have them, and then add your hosing to the water pump.
Step 3: Fill Bucket with Water
You want to fill your bucket with enough water to touch the bottom of the net pots or net basket. This will help your plant roots find the water solution more quickly and keep them from drying out.
Using distilled water is said to have better results than tap water, so if you can get some, use it. While the bucket is a 5-gallon bucket, you will never need a full 5 gallons.
If you’re using tap water, let it sit out for 24 hours. This apparently helps dissipate some of the chlorine in the water.

Making sure the water level reaches the bottom of the net pot or net basket will help the plant roots get more established.
Depending on how big your plant is when you put it in this system, you might need to water overhead for the first few days until the roots can reach the nutrient solution.
Step 4: Add Nutrients
Here’s where it gets interesting, especially if you’re a beginner. Hydroponic nutrients can be quite tricky if you’re not used to growing this way.
I’ll be growing tomatoes in my system so I’m adding a mixture of MasterBlend, calcium nitrate, and magnesium sulfate.
For every gallon, here is the nutrient solution recipe:
- 2.4 grams Masterblend
- 1.2 grams of Epsom salt/Magnesium sulfate
- 2.4 grams of Calcium nitrate (15.5-0-0)
This is the recipe from the MasterBlend bag, but divided by 5, since theirs is for a full 5 gallons of water.
How to Mix Your Nutrients
You’re not supposed to just throw those things in a bucket at the same time. Here are the steps to mixing your nutrients properly.
1. Add 2.4 grams of MasterBlend for each gallon of water. Let this dissolve completely. You can use a paint stirrer or long spoon to reach the bottom and get everything to dissolve.
2. Add 1.2 grams of Magnesium sulfate per gallon of water. Let all of this dissolve completely as well before adding your calcium nitrate.
3. Add 2.4 grams of Calcium Nitrate per gallon of water. Let it dissolve fully.
If you mix the Calcium Nitrate and Epsom Salt together first, you will most likely end up with undissolved solids and end up with nutrient lockout, so add in the calcium nitrate last.
Step 5: Check the pH
Once you add the nutrients to your water, wait around 15 minutes and then go ahead and check the pH.
You can use a digital pH meter (like this one) or the old-school pH test kit with strips. Whichever method you’re used to is fine.
The pH of your water should be between 5 and 6 (around 5.5 is what I aim for).
Nutrients usually lower the pH level of the water, so if you check it beforehand, go ahead and check it again to make sure it’s within range.
If your pH is too high, you can use pH up or down to adjust it. Add small amounts first as you can always add more, but it’s kind of a waste if you add too much.
Upkeep & Maintenance
Check the pH of your water and nutrient solution every few days to make sure it’s within range. If you need to adjust the pH, you can add pH up or pH down.