Being able to harvest tomatoes right in your kitchen is such a treat, and they taste much better than grocery store tomatoes.
Growing tomatoes indoors can be challenging, but with an Aerogarden it can almost be considered easy. Most Aerogardens come with some sort of tomato seed pod kit, so it’ll likely be one of the very first things you grow.
How to Plant Tomatoes in Your Aerogarden
There are a few steps we need to do to make sure we get bountiful, great-tasting tomatoes. This process is very similar to growing tomatoes in pots if you’ve done that before.
Step 1: Clean Your Aerogarden
Even if your device is brand new, you’ll want to rinse and clean out the growing basket of any factory gunk that might be in there. Aerogarden says they’re sanitized, but who knows what happens to them between the factory and your home.
If you’ve grown other plants in this Aerogarden before, you want to clean it to get rid of any algae or other gunk that the plant may have left behind. Otherwise, whatever is left behind may cause issues when it comes to the health of your tomatoes.
Step 2: Setup the Grow Lights & Start New Grow
You want your lights to be within 6 inches of the new plants to make sure they are getting enough light to grow properly. Usually, the lowest height setting of your Aerogarden is perfect.
If you’ve already used your Aerogarden, you need to reset it to grow vegetables, and that should set the lights to be on between 16-18 hours a day. If your Aerogarden is new, follow the instructions on the box to start a “Quick Grow.”
Step 3: Plant Your Seeds
If you already have your pre-planted seed pods, then you can go ahead and add them into the pods in your garden. Tomatoes can get quite unruly, so I’d recommend leaving at least one or two pods empty between your plants.
Note: If you have empty spaces, make sure to put pod covers over the holes. This helps keep the light from getting into those holes and forming algae around your growing bowl.
If planting your own tomato seeds, the process is pretty straightforward. Using your sponge or other growing medium, simply drop 1-2 seeds into the center and place the sponge in your plastic grow basket.
These help keep algae from growing when you have empty pods in your Aerogarden. They also prevent a lot of evaporation from occurring.

Step 4: Put the Domes on top
These mini humidity domes help the seeds stay warm and trap humidity to help them germinate faster. Once you see your little sprouts coming up make sure to remove them immediately.
Step 5: Add Water
Of course, nothing is going to grow without water! Go ahead and fill up your water reservoir to the fill line. While it doesn’t always need to be completely full, it’s a good idea to fill it even before you are reminded to.
Having a high water line is going to result in your plants growing faster than letting them dry out a bit.
Step 6: Add Nutrients/Plant Food
When starting new plants, you want to add some plant nutrients to the water to help them grow without soil.
The amount you need to add will depend on how many plants you’re growing and which type of Aerogarden you are using. Aerogarden comes with its own “patented liquid plant food” but you don’t need to use this. A lot of people have better results when growing tomatoes with other fertilizers like this blend.
Step 7: Watch Your Plants Grow!
That’s everything you need to do to start tomatoes in your Aerogarden. But that’s just the beginning! Let’s walk through the stages that will happen next, and how you can best care for your tomato plants.
Aerogarden Tomato Growth Stages
There are multiple stages your tomato plant will go through while it’s growing.
The Germination Stage (Weeks 1-3)
After 10-14 days, your seeds will germinate and you’ll start to see tiny tomato sprouts starting to emerge from your seed pods.
What you need to do:
If you see two sprouts coming out of one hole, you want to make sure to remove whichever one is smaller. I mentioned needing space between your tomato pods for plants to grow, so you definitely don’t want to grow 2 in 1 pod space. You’ll end up with much smaller tomatoes (if any) since the plants will be competing for space.
Otherwise, just make sure they are topped up with water and you add nutrients at week 2. If your seeds don’t sprout by day 20-25 I’d start a new batch as they likely won’t germinate. This can happen with damaged seeds, old seeds, or even just the seed falling out of the seed pod kit before you even planted them.
The Pruning Stage (Weeks 4-6)
During the 5-7 week mark, you’ll want to prune your plants back a bit to keep them compact enough to fit in your Aero garden. If you let them grow wild, they will grow in every direction and your Aerogarden will be too crowded for a healthy amount of airflow to get in. More one how to prune your tomatoes below.
Pruning your tomato plants is one a hotly contested item among Aerogarden enthusiasts. Some say you don’t need to because most tomatoes grown in an Aerogarden don’t need it. While other’s argue that it’s a necessary task to ensure a healthy heirloom tomato plant.
I personally think it is a critical thing to do because without pruning, your plants will turn into a bush that grows in every direction, and mostly horizontal.
Pruning helps keep the plant growing upright on its main stem, instead of putting its energy into creating new branches and sprawling out.
Now, technically if you’re growing bush or dwarf varieties, pruning actually isn’t necessary. Of course, you can trim back brown or yellow leaves showing signs of distress to help the plant focus isn’t energy on healthy parts. But if you’re growing any other kind of tomato, then I’d recommend at least some minor pruning as they will grow branches in every direction instead of growing upward on a main stem.
How to Prune Aerogarden Tomatoes
When your plant has 5 branches is when I’d start pruning. What you’re trying to do with pruning is to remove any new stems that appear that could cannabalize the main stem.
We call these new stem growths “suckers”, as they’ll suck energy out of the plant by trying to get bigger, when the plant should be focusing on strengthening its current branches.
If you have a branch that’s already flowered, I would leave it alone. But if you have a new branch like you see below that is just leaves, you can go ahead and remove it with pruning shears or scissors.
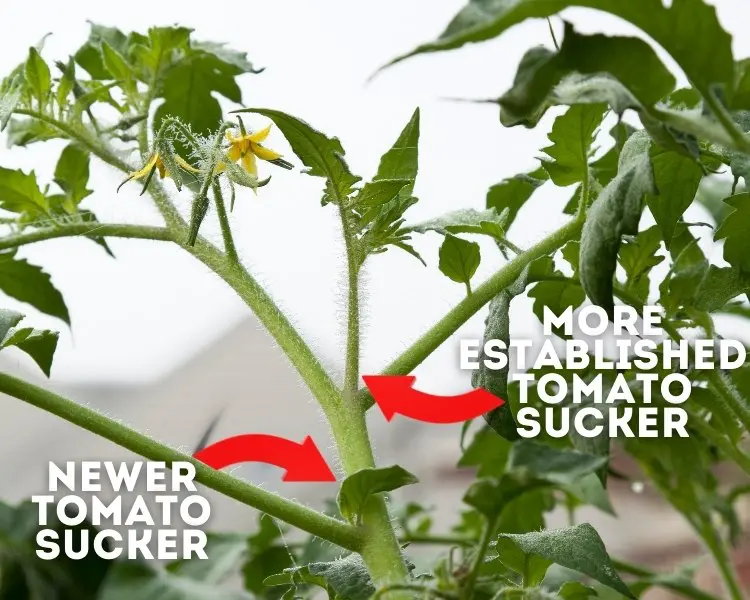
Keep an eye out for suckers along the way while your plant is growing. Pruning these off helps the plant focus on growing the fruit larger, instead of creating more tomatoes.
The Flowering Stage (Weeks 5-8)
Your tomato plant will start producing yellow flowers – this is a great sign! That means they are starting to produce fruit. And once a flower is pollinated, the plant begins creating fruit.
Now the trouble with this part is that since you’re growing indoors, there aren’t bees and other insects that will pollinate your tomato flowers.
How to Hand Pollinate Your Flowers
Since there are no pollinators flying around your home (I hope!), you’re going to want to hand pollinate your flowers. It’s easy! Since tomatoes are self-pollinating, they just need the pollen moved around a bit within the flower, while other plants that aren’t self-pollinating actually need a bee to visit both flowers in the same flight.
You can use your finger and just shake the flowers a bit to get the pollen moving around, or you can use a toothbrush or similar sized object. Shake the toothbrush around in the flower for about 5-10 seconds and that should be enough to pollinate it. Kinda cool huh?
If you don’t hand pollinate your tomato flowers, you will get no tomatoes unless a miracle happens. If your flowers are falling off the plant (aka blossom drop) without leaving behind the start of a fruit, the most likely cause is them not being fully pollinated.
Try to keep an eye out for any new flowers that need to be pollinated before they end up falling off the plant and you end up without that fruit.
When to Pick Aerogarden Tomatoes
So you’ve got some fruits growing in your Aerogarden, but when should you pick tomatoes and how do you know when they are ripe?
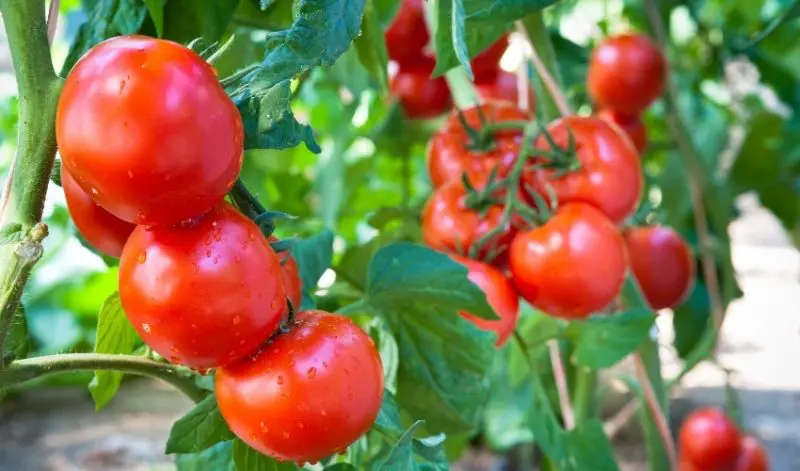
Aerogarden tomatoes can stay on the vine until they are red. You can pick them when they are green but starting to turn pink, this is known as the “breaker stage”, and they will ripen on the counter for a few days.
When growing tomatoes outdoors, you usually want to pick them when they start turning from green to pink to avoid any animals from getting to them before you do. But since you’re growing indoors with an Aerogarden, this isn’t an issue and you can leave them on the plant until they are as ripe as you like them.
And congratulations – you’ve officially grown an Aerogarden tomato!
What Kinds of Tomatoes Can You Grow in an Aerogarden
Because you’re growing indoors with a restricted grow height, you’ll need to be aware of which types of tomatoes you can and can’t grow in that space.
Determinate tomato varieties are best for an Aerogarden as the vertical space is limited. Indeterminate tomatoes can get to be 6-8 feet tall, which just wouldn’t work in a small space like an Aerogarden.
In addition, while growing tomatoes in any Aerogarden model is doable, if you want to grow mature tomato plants, you’ll want to look into the Aerogarden Farm family. You can get up to a 36-inch grow height, which is a great amount of room for a dwarf variety of tomatoes to grow to full height.
Dwarf Tomatoes
When you grow fresh tomatoes in your Aerogarden, you’ll want to pick varieties that are dwarf or bush varieties. If you choose a plant that’s too big, you’re going to have a helluva time keeping it contained in your small growing space.
Cherry Tomatoes
Cherry tomatoes are a great place to start if you’re growing your first tomatoes indoors. They’re generally a smaller plant, and the fruit doesn’t get super big and crowd out all of the space.
Now, that doesn’t mean that you won’t get delicious tomatoes. Yellow cherry tomatoes are my absolute favorite!
Aerogarden has a cherry tomato seed pod kit you can use to grow great-tasting cherry tomatoes, or you can create your own with your favorite tomato seeds and some unseeded Aerogarden pods.
Some good options for your Aerogarden:
- Orange Hat tomatoes
- Red Heirloom Cherry Tomatoes
- Tomato Veranda Red Hybrid
Growing Aerogarden tomatoes indoors means you get that delicious homegrown flavor all year round. You can use the tomato seed pod kit or buy your own seeds to grow. Either way, the Aerogarden experience of growing tomatoes is easy enough, even for those self-proclaimed “black thumbs”.