If you’re anything like me, you usually just buy baby plants at the store when spring comes around and you were ready to plant them outside. But starting seeds indoors is a great way to get a head start on the gardening season.
When I was a beginner, I just bought some random seeds and some plants that were already started (there was literally no pre-planning done before I went to the store), threw them in the ground, and let them grow.
It worked out okay, but I can see the plus sides in starting early. This is one of the better gardening tips I’ve found so far.
While it might seem hard to do at first glance (why start seeds inside when you can just buy them already growing?), I’m giving it a shot this year.
What is Seed Starting?
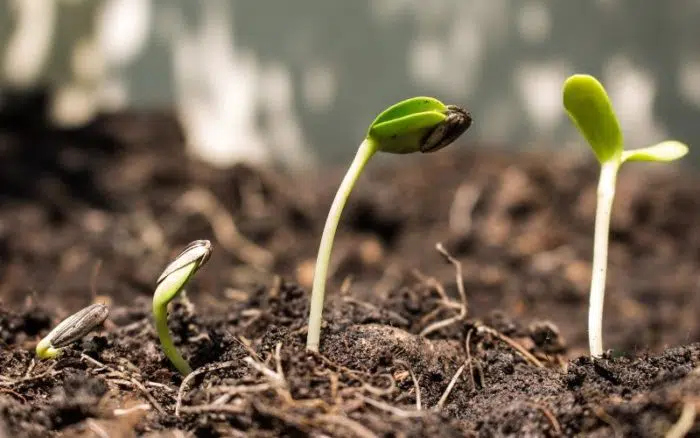
Starting seeds is just planting seeds (get it? starting seeds) indoors and then moving them outdoors once they’re established and it’s warm enough to put them in the ground.
That’s really it in a nutshell – seeds started indoors.
Why Should You Start Seeds Inside?
Because then you can call yourself a real gardener. 🙂
In all seriousness, there are a few reasons you’re going to want to grow some of your plants inside before transplanting them into the ground.
1. Get a Head Start on the Growing Season
Plants take time to grow from seeds, that doesn’t change. Even if you’re using grow lights and fertilizer, your plants need that time.
If you wait and plant your seeds in the ground once it’s warm enough, you’re going to need a few weeks for them to even become established enough to have leaves.
With the growing season only lasting a certain amount of time, some slow-growing plants (i.e. tomatoes) won’t even get to the point of bearing fruit before the first frost comes and kills them.
If you live in a place with an already short growing season, you’re kind of shooting yourself in the foot if you don’t start seeds before spring arrives.
2. You’ll Have a Bigger Harvest
Plants take time to grow, and if they have more time to grow (i.e. a longer growing season), you’re going to get more from that plant.
Of course, not everything reseeds and bears more fruit in the same season, but quite a few plants will.
3. You Save Money Over Buying Seedlings
At the Lowes near me, and local garden centers, you can buy tomato seedlings in a pot for $4.98. This plant isn’t organic or anything, just conventional.
But at the same store, you can get a packet of organic, non-GMO tomato seeds for $2.49. A packet of seeds will probably have around 150-200 seeds in it – so you’re making out like a bandit even if only a third of the plant seeds actually grow.

Buying seed packets also allows you as a gardener to save seeds for the next year if you don’t use them all this season.
4. You Can Grow More Varieties Than You’ll Find at the Store
Have you ever seen some crazy yellow tomato variety and wanted to grow that in your garden? Good luck finding that tomato plant already started at the store for you.
With seeds, you can choose from thousands of fruit and vegetable garden varieties and try things you can’t even find at your local farmer’s market or grocery store.
5. Seasonal Depression – Ever Heard of it?
I’m not going to sit here and claim that starting your garden early will cure this, but you better believe that having some green things growing in your house will help!
Starting your garden earlier is a great way to help when you’re really over the winter season.
Is it Really Necessary to Start Seeds Indoors?
If you’re looking to grow normal varieties of plants, aren’t planning on growing tomatoes or other slow growing plants, and/or want to just buy already started plants at the store, then no.
But otherwise, yes you’re going to want to consider it.
What Plants Should (And Shouldn’t) Be Started Inside?
Not all plants need to/should be started inside though. And the major caveat here is that there are a few caveats.
- Your plant hardiness zone. If you have a shorter growing season because you’re in Northern Minnesota, that will impact things.
- The variety of plants you’re growing (be sure to check your seed packets and use that to help you decide)
Here is a seed starting chart with some common plants to start from seeds inside vs outside.
| The Best Seeds to Sow Indoors | Best to Sow Outside | Can Go Either Way |
| Broccoli | Beets | Corn |
| Brussels Sprouts | Carrots | Beans |
| Cabbage | Garlic | Kale |
| Celery | Onions | Spinach |
| Corn | Peas | |
| Cucumbers | Potatoes and other root vegetables | |
| Eggplant | Radishes | |
| Lettuce | Sweet Potatoes | |
| Peppers | Zucchini/Squash | |
| Tomatoes |
What’s Needed for a Seed Starting Kit
So here is what you’ll need for an indoor seed starting kit:
1. Seeds
This one is pretty obvious, right? 😉 Buy the quality seed though, you will be eating this after all! If you’re using seeds from previous years, make sure to check the expiration date on your seed packet to see how long your seeds last.
2. Seed Starting Mix
What is the best soil for starting seedlings indoors? The best soil for starting seeds is a sterile or soilless mix (not potting mix). I explain more about the best soil to use here.
While you don’t need to use actual soil, some kind of soil medium is needed.
3. Fertilizer or Compost
While seeds contain all the nutrients they need to grow into seedlings, after that they will start pulling nutrients from the soil.
While seed starting mix is great for getting going, these soil mixes often don’t contain enough nutrients to keep them growing to full size. That’s where fertilizer comes into play.
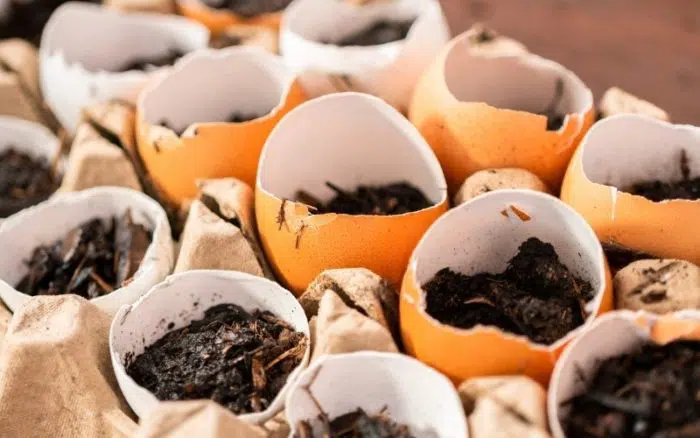
4. Containers (cups, egg cartons, seed starting tray, etc.)
Choosing the right containers is important. You want something that will hold water reasonably well, but also drains really well. Some common options for containers are:
- Soil Blocks– yes, it’s what it sounds like – blocks of soil you plant a seed in but they’re compact enough that you can use them as actual containers.
- Egg cartons – egg cartons are the cheapest method for starting seeds in containers. If you’re going to use egg cartons, cut drainage holes in the bottom so they don’t stay too wet.
- Seed Starting Trays
- Peat Pots – peat pots are great because you can plant the full containers in the ground. However, peel some away when planting them into the ground as it does take some time to fall away which can cause a smaller plant.
5. Light source
All plants need light in order to grow, especially seedlings started indoors. The kind of light seedlings need can be as simple as placing the plant near a window, or you can get fancy with some LED or fluorescent lights to speed up growth and/or provide a heat source.
Keep in mind that real sunlight is always better than supplemental lighting, but depending on where you live or the windows in your home, that might not be an option.
6. Heat Source
Seedlings grow best between 68 and 86 degrees Fahrenheit. While vegetable varieties differ in terms of the perfect temperature, a good rule of thumb is 75 degrees. That is probably warmer than room temp in your home (unless you are trying to sweat yourself out of the house).
There are things called seedling heat mats that you can use that are a great option to help regulate the temperature and ensure your seedlings get started off on the right foot. Heat mats are what a lot of gardeners use to ensure their seeds germinate (seeds sprout) at the right temperature.
I’m planning on buying some heat mats so I’ll do a review later and let you know how it goes!
7. Water Source
When you first plant vegetable seeds indoors up until germination (i.e. when you have a baby plant), they’re going to need consistent water (but don’t drown them either).
There are things called automatic watering systems that you can buy so you don’t have to constantly pay attention to your seedlings and they’ll still get the water they need. I’m going to hold off on that purchase for now, as it seems a little “extra.”
Starting Seeds Indoors Step-by-Step
Step 0. Believe in Yourself as a Vegetable Gardener
Cheesy? Sure. But oftentimes we overthink this process WAY too much. Often to the point of not planting what we wanted to because we aren’t confident.
Pick some seeds, soil, lights, and a heat mat, and just get started growing your favorite type of seedling. Can you pick the wrong lights or use your lights wrong? Of course! But trying something is better than sitting around wishing you knew how to do it.
Don’t take failure as a sign of being bad at this, just know that it’s a process to get good at this. Failure is a necessary step along the way.
Step 1. Choosing Plants to Grow
So now we know which seeds to start indoors and which can be planted directly into the soil when it’s growing season.
How do you pick the vegetables/plants you’re going to grow?
Of course, you can just go to garden centers or the local big box store (Lowes, Home Depot, etc.) and buy some organic seeds. But, there are SO many more places you can go to buy seeds and those places often have a lot more varieties you can pick from.
But I’m giving you a fair warning… it can be overwhelming.
I’m someone who likes the nicer restaurants because there are fewer choices on the menu. I am the worst when it comes to making decisions, especially about food.
And growing your own fruits and veggies is like creating your own menu – talk about the pressure! This is why my first “real” garden is going to be at least 5 rows that are 50 feet long – and we’re TWO people.
I can’t help it – and I realize it’s ridiculous. I’m going to end up growing enough food that I’ll have to walk around my neighborhood giving it away. It is what it is.
Here are some places I’ve bought seed packets from so far that turned out nicely:
Step 1.5 – Soaking Seeds Before Planting
I’m going to call this step 1.5 because it’s not for every kind of plant.
There are things called hard-coated seeds. They essentially have a harder outside shell than others as a way to protect them from prematurely growing.
Hard-coated seeds will germinate faster if you soak them before planting – no longer than 24 hours or else you risk introducing rot.
Examples of vegetables that have a hard-coated seed:
- Morning Glories
- Chart
- Beets
- Okra
You don’t need to soak seeds that aren’t hard-coated.
Step 2. Add Your Soil (or non-soil – ha!) to Your Containers of Choice
You’ll need enough garden soil to give plants room to spread their roots. If you’re using egg cartons or seed trays for your containers, fill those up. But…
What is the Best Soil for Starting Seedlings?
This is going to sound pretty strange, but what’s called a “soilless” or “sterile” mix is generally the best seed starting mix. I’ll explain further…
Soilless Mix
If it looks like soil, it must be soil right? Not exactly.
While a soilless potting mix looks similar to soil, it’s actually a combination of organic matter like coco coir, peat, perlite, sometimes vermiculite, and usually some kind of slow-release fertilizer.
“Normal” soil usually contains inorganic matter, stuff like silt, clay, or sand, but soilless doesn’t have any of those things.
Soilless is a favorite among gardeners and is great for starting vegetable seeds because it holds water well, is fluffy, and has nutrients that seedlings need to get going.
Potting Soil or Potting Mix is not a great option for starting seeds. And definitely don’t reuse potting soil as the nutrients have probably been depleted from previous seedlings.
Potting mix has too many nutrients for young seedlings. Once seeds germinate, they’ll need these nutrients. But when starting seeds indoors, you want to stick to a soilless or sterile seed starting mix.
Sterile Seed Starting Mix
I initially thought “sterile” was a bad thing, a process where they killed off all the good stuff while trying to just get rid of the bad stuff. Apparently not though.
A sterile mix means that the company heated the seed starting mix above a certain temperature to get rid of bacteria and fungi that could end up harming or killing your seedlings.
So just remember – sterile and soilless. Those are the two things to look for when getting soil when you sow seeds.
Step 3. Moisten the Dirt
Make sure the dirt is kind of wet before you actually plant any seeds. I like watering the dirt before planting to help keep you from drowning your seeds and wash them away (which I’ve done many times).
Step 4. Sow Those Seeds – but not too deep!
What is the right depth for sowing seeds in containers? Just below the surface of the dirt. You want them to be close enough to the top of the soil in your containers to be able to actually receive the light and start growing.
How many seeds do you put in each hole? It depends, but usually one or two. Check the seed packet for instructions to be sure you don’t add too many.
It’s generally better to sow the seed too shallow than too deep so they can get enough light.
Lettuce seeds should barely be covered in your containers because seeds need a lot of light to germinate.
Step 5. Water, Fertilize, Sunlight (or Fake Light) and Repeat
You can use a mister or small watering can to keep the soil moist but not soaked. Think of these like your little babies that need quite a bit of attention.
It’s best to water the soil not the leaves as this can harm the plant and create disease spores. I’ve made this mistake LOTS in the past, and that’s probably why every plant I brought into my house in the past had a lifespan of 2 weeks.
If you aren’t watering them enough, they’ll show you a sign and let you know. Seedlings need enough water, but adding too much is almost worse.
The solution? A technique called “bottom watering.”
Have you ever had seedlings grow but then the leaves just start drooping? Yea, that’s a sign they need water, so try and get them watered before it gets to that point.
If you’re using fertilizer, apply it as directed on the bag/box/bottle.
If you have the seedlings getting their light from a south-facing window, make sure you are turning them regularly so they don’t end up growing sideways.
If you’re using grow lights, don’t keep them on all day every day. Supplemental lighting is important, but they force growth and young plants need rest too.
Step 6. Hardening Off
Wait, what?! Yes, it’s a strange name, but stick with me – this is important!
One of the riskiest things you can do is putting your plants in the ground the first time they’re exposed to the outdoors.
That’s like going from summer to winter the next day. Even if it’s 75 degrees outside, the wind and sunshine are completely different from what they’ve grown up with.
Instead, you want to ease them into it. This process of easing your seedlings into the outdoor elements is called “Hardening off.”
Take your seedlings outdoors for a few hours and put them in a protected spot (little wind, and some shade), then bring them in. Gradually expose them to more and more of the elements every few days.
If it’s going to rain and it’s cold, don’t expose them to that yet. Seedlings need to be exposed slowly. Wind and sun can also dry out plants so stay on top of watering as well.
Keep an eye on the weather during this time, and bring them inside if harsh weather is expected.
Step 7. You’re Ready to Go, So Get Those Babies in the Ground!
Once the last frost has passed, it’s safe to get your plants outside. After you’ve hardened off your seedlings and they are no longer soft millennials, it’s time for them to go into the ground.
Plant your plants as close as you can to the first set of leaves. Planting them deep like this helps strengthen the plant even though it might seem counterintuitive.
Make sure you water the seedlings regularly and your babies should grow into full-blown edible plants.
Happy gardening!